


 Motorola Solution Pack Download,
Sunday, August 31, 2014
How to Factory Reset Sony Xperia Z1 Compact
How To Reset Erasing All Your Files:
1. On your Home screen, tap .
.
2. Go to Settings, and select Backup & reset.
3. Tap on Factory data reset.
4. Then Reset phone.
5. Confirm by tapping Erase everything.
You just need to wait while your phone deleting your files and restoring your settings to default.
How To Reset Without Erasing Your Personal Data:
1. On your Home screen, tap.
2. Go to Settings, and select Backup & reset;.
3. Tap on Settings reset.
4. Then Reset phone.
5. Confirm by tapping Reset settings.
Wait while your phone restoring your settings.
Read More..
1. On your Home screen, tap
.2. Go to Settings, and select Backup & reset.
3. Tap on Factory data reset.
4. Then Reset phone.
5. Confirm by tapping Erase everything.
You just need to wait while your phone deleting your files and restoring your settings to default.
How To Reset Without Erasing Your Personal Data:
1. On your Home screen, tap
.2. Go to Settings, and select Backup & reset;.
3. Tap on Settings reset.
4. Then Reset phone.
5. Confirm by tapping Reset settings.
Wait while your phone restoring your settings.
Samsung Galaxy S i9000 Mic Ways fix problem

All In One Usefull Android Mobile Tablets Usb Driver Free Download
USB Drivers play a vital role when we wish to connect our phone to computer. You need to install USB Driver first for your mobile device to get connect and interact with your PC and the Android Smartphone and Tablet devices are not exception. We do various task by connecting our phone to PC such as- transferring data between computer and phone, syncing mobile to PC, rooting android phone, installing custom recovery like CWM Recover or TWRP Recovery, updating official firmware or flashing custom firmware. We need to use some tools like Odin, SuperOneClick etc. So, without installing the proper USB driver for your phone, you can’t connect it with your PC and do all these important task.
![Old]()
In this article, you’ll find USB Drivers for Android Devices for almost all Android Smartphone and tablets manufacturers such as- Samsung, Motorola, Sony, LG, HTC, Micromax, Acer, Dell, Lenovo, Asus, ZTE and many more. Although all the android mobile manufacturers provide USB drivers for their device along with the device model but you can also download drivers from their support page or anywhere else online. One more notable thing is, for most branded device windows install the USB driver automatically but if its not done, you have to do it manually.
Here we have listed USB drivers for android devices for almost all manufacturers. Note that, single USB driver from a manufacturer can be used for all the models of that manufacturer, so you do not need to download separate USB driver for all the models of the same manufacturer. Download USB driver for your android phone from the below list.
Also Read: Complete Data Backup Guide for Android Mobile
Note: All the USB drivers here listed are only for the Windows PC. If you are looking Android USB Drivers for Mac or Linux, then we recommend you to visit respective manufacturer website and download from their support page.
Download Samsung Kies Utility
Or Direct Download Samsung Kies from Here
or Direct Download HTC Sync Manager from Here
or Download Latest Sony PC Companion from here
Download Asus USB Driver or Download Asus USB Driver
Download Asus Nexus 7 USB Driver or Download Asus Nexus 7 USB Driver
Download Huawei USB Driver
So, find USB driver for your android Smartphone or tablet from the above list. We have covered as much Android USB Drivers from various manufacturer. Hope you find USB driver for your android phone. If your android phone manufacturer is not in the above list, then contact with us with your mobile manufacturer name, model name and code number using the comment form below, we’ll help you to get USB driver for your mobile.
Read More..
In this article, you’ll find USB Drivers for Android Devices for almost all Android Smartphone and tablets manufacturers such as- Samsung, Motorola, Sony, LG, HTC, Micromax, Acer, Dell, Lenovo, Asus, ZTE and many more. Although all the android mobile manufacturers provide USB drivers for their device along with the device model but you can also download drivers from their support page or anywhere else online. One more notable thing is, for most branded device windows install the USB driver automatically but if its not done, you have to do it manually.
Here we have listed USB drivers for android devices for almost all manufacturers. Note that, single USB driver from a manufacturer can be used for all the models of that manufacturer, so you do not need to download separate USB driver for all the models of the same manufacturer. Download USB driver for your android phone from the below list.
Also Read: Complete Data Backup Guide for Android Mobile
Note: All the USB drivers here listed are only for the Windows PC. If you are looking Android USB Drivers for Mac or Linux, then we recommend you to visit respective manufacturer website and download from their support page.
Download Android USB Driver for Samsung Mobile
Download Samsung USB DriverDownload Samsung Kies Utility
Or Direct Download Samsung Kies from Here
Download Android USB Driver for LG Mobile
Download LG USB DriverDownload Android USB Driver for HTC Mobile
Download HTC Sync Manageror Direct Download HTC Sync Manager from Here
Download USB Driver for Motorola Mobile
Download Motorola Device ManagerDownload USB Driver for SONY Mobile
Download Sony PC Companionor Download Latest Sony PC Companion from here
Download USB Driver for Asus Mobile
Download Asus PC SuiteDownload Asus USB Driver or Download Asus USB Driver
Download Asus Nexus 7 USB Driver or Download Asus Nexus 7 USB Driver
Download USB Driver for Acer Mobile
Currently we do not have any direct download link for Acer USB Driver. You can download Acer Android USB Driver from the below process:- Go to Support page of Acer
- Choose country
- Select Drivers and Manuals
- Select your device
- Select OS and Download driver from there
Download USB Driver for Lenovo Mobile
Download Lenovo USB DriverDownload USB Driver for Dell Mobile
No direct download link available. Follow the below step by step guide to download USB driver for Dell android mobile:- Go to Dell product support page
- Click on tablet or mobile device
- select device from the list
- Download driver
Download USB Driver for ZTE Mobile
Download ZTE USB Driver or Download ZTE USB DriverDownload USB Driver for Huawei Mobile
Download Huawei HiSuiteDownload Huawei USB Driver
Download USB Driver for Intel Mobile
Download Intel USB DriverDownload USB Driver for Amazon Mobile
Download Amazon USB Driver or Download Amazon USB DriversDownload USB Driver for Sharp Mobile
Download Sharp USB DriverDownload USB Driver for Pantech
Download Pantech USB DriverDownload USB Driver for Alcatel Mobile
Download Alcatel One Touch USB DriverDownload USB Driver for Fujitso Mobile
Download Fujitso USB DriverDownload USB Driver for XIAOMI Mobile
Download XIAOMI USB DriverDownload USB Driver for Asus Garmin
Download Garminfone PC Sync SoftwareDownload USB Driver for KT Tech Mobile
Download KT Tech USB DriverDownload USB Driver for Kyocera Mobile
Download Kyocera USB DriverDownload USB Driver for Pegatron Mobile
Download Pegatron USB DriverDownload USB Driver for Teleepoch USB Driver
Download Virgin Mobile Chaser USB DriverDownload USB Driver for Oppo Mobile
Download Oppo Find 5 USB DriverSo, find USB driver for your android Smartphone or tablet from the above list. We have covered as much Android USB Drivers from various manufacturer. Hope you find USB driver for your android phone. If your android phone manufacturer is not in the above list, then contact with us with your mobile manufacturer name, model name and code number using the comment form below, we’ll help you to get USB driver for your mobile.
Saturday, August 30, 2014
Sprint HTC Arrive Soft Hard Reset Format Factory Settings
There are still plenty of options and an ever-growing list of apps and games available in the Windows Marketplace for HTC Arrive. But the tweaking may end up if you decide to sell or give to others your HTC Arrive and buy a new phone. And you want to restore the settings to its original default settings so that all of your files and personal information cleared from memory..

Heres a steps on how to hard reset your HTC Arrive:
1. On the home screen, swipe left to expose your app list
2. Tap Settings
3. Scroll down and tap about
4. Tap reset your phone
5. Tap yes to confirm, then tap yes to confirm again
The phone will then reboot and return with a factory fresh settings.
Samsung Wave S5253 Insert Sim DONE Solution Here
Samsung Wave S5253 Insert Sim.. DONE. Solution Here..
Friday, August 29, 2014
Samsung C160m All Keypad Not Working Done Tested 100
Samsung C160m All Keypad Not Working Done Tested 100%


Nokia Best Firmware Donloader all In One Version 5 0 Released
Offline NokifirmVersion 5.0Nokia Latest Firmware Downloader
More Updated Firmware Versions Added
![Offline]()
DOWNLOAD
Read More..
More Updated Firmware Versions Added
DOWNLOAD
Nokia 1661 torch light solution
Torch light is the most important thing for every man.It is very useful for night time.Now I share how to repair Nokia 1661 torch light.first view the below picture.

How to do this work: At first check led If you see led is damage then replace led.If you see led ok but problem still then check Led ways if you see damage ways then make this jumper following this picture.
Thursday, August 28, 2014
Blackberry bold 9700 Earpiece Speaker Problem Repair Solution
Just refer to the solution below and locate the highlighted components. Then visually check it, do a re-hot, re-solder or replacement when necessary.

How to Backup Galaxy S3 EFS Using One Click Method
Each time you decide to update your Samsung Galaxy S3 with a custom ROM firmware, or with an unofficial port of the Android system, you can end up in losing the data which is stored on its internal storage memory. Unfortunately, not only the usual data, like contacts, messages, call logs, or market apps, might get wiped out as the internet setting or the EFS folder might get erased too. So, for avoiding the unpleasant situations, I will teach you how to backup and restore the EFS from your SGS3 by using the one-click method. As usual, you have it all explained in an easy to follow step by step guide, so let’s get started.
But, why to backup the EFS? Well, the EFS store the IMEI and allow your handset to establish the internet connection, so in case it gets erased your phone will no longer be able to use the Internet connection. So, if you have recently updated your Galaxy S3 and cannot use the internet connection, then probably the EFS folder was wiped out. That’s why you need to previously backup it so that you can easily restore the same when needed. For those who cannot apply this, the only solution is to downgrade to the stock ROM, or to apply an official update released by Samsung and suitable with the S3.
There are many ways for learning how to backup the EFS, today we will explain the one-click tool variant. For this you will have to use a Windows powered computer and the phone USB cable as you will connect the S3 with the PC. Furthermore, this procedure implies in having a rooted smartphone. If not you should go and first gain root access and remove the factory restrictions. Be aware as by ding this the warranty will get void. I recommend you to search through our how to section for a suitable step by step guide from which you can find everything you need to know about the root operation. Then, return here and resume the rest of the guide.
Remember that it is recommended to backup all the data from your Galaxy S3 (before updating or making changes into its system), not only the EFS folder. It’s important to save all of your personal info as it probably get corrupted. For a full backup you can download SMS apps for Android, call logs backup and restore apps, sync with Google for saving the contacts or use a custom recovery image (like CWM recovery) for backing up the current ROM.
Just before completing the steps you must deactivate the security tools from the computer and from the phone as these programs might interrupt the backup operation, by stopping the one-click tool. Then, enable the USB debugging option on your S3 (you can see how during the steps) and charge the battery of your smartphone for ensuring that it will not get turned off in the middle of the process.
Take note that the present tutorial can be applied and should be applied only for the Samsung Galaxy S3 and not on any other Android powered handset. This method was first developed and tested by those of xda-developers so we have them to thanks for this opportunity. Now, you can finally head and complete the proper steps. Read all carefully and don’t perform things by yourselves. The process is easy and completing it will only take a couple of minutes from your time therefore let’s begin.
Read More..
But, why to backup the EFS? Well, the EFS store the IMEI and allow your handset to establish the internet connection, so in case it gets erased your phone will no longer be able to use the Internet connection. So, if you have recently updated your Galaxy S3 and cannot use the internet connection, then probably the EFS folder was wiped out. That’s why you need to previously backup it so that you can easily restore the same when needed. For those who cannot apply this, the only solution is to downgrade to the stock ROM, or to apply an official update released by Samsung and suitable with the S3.
There are many ways for learning how to backup the EFS, today we will explain the one-click tool variant. For this you will have to use a Windows powered computer and the phone USB cable as you will connect the S3 with the PC. Furthermore, this procedure implies in having a rooted smartphone. If not you should go and first gain root access and remove the factory restrictions. Be aware as by ding this the warranty will get void. I recommend you to search through our how to section for a suitable step by step guide from which you can find everything you need to know about the root operation. Then, return here and resume the rest of the guide.
Remember that it is recommended to backup all the data from your Galaxy S3 (before updating or making changes into its system), not only the EFS folder. It’s important to save all of your personal info as it probably get corrupted. For a full backup you can download SMS apps for Android, call logs backup and restore apps, sync with Google for saving the contacts or use a custom recovery image (like CWM recovery) for backing up the current ROM.
Just before completing the steps you must deactivate the security tools from the computer and from the phone as these programs might interrupt the backup operation, by stopping the one-click tool. Then, enable the USB debugging option on your S3 (you can see how during the steps) and charge the battery of your smartphone for ensuring that it will not get turned off in the middle of the process.
Take note that the present tutorial can be applied and should be applied only for the Samsung Galaxy S3 and not on any other Android powered handset. This method was first developed and tested by those of xda-developers so we have them to thanks for this opportunity. Now, you can finally head and complete the proper steps. Read all carefully and don’t perform things by yourselves. The process is easy and completing it will only take a couple of minutes from your time therefore let’s begin.
How to Backup and restore Galaxy S3 EFS Using One-Click Method
- First of all, on your computer, download Samsung KIES for installing the proper drivers for the S3.
- Then, on the same computer download the EFS backup and restore app from here.
- You must get the .rar file.
- Extract the file.
- On your S3 the USB debugging option must be enabled. Go to Settings -> Developer and ensure that the USB debugging option is checked.
- Now, connect the device with the computer by using its USB cord.
- Once the handset connected, go to the folder where you extracted the downloaded file and click on the “Backup_EFS” executable.
- Just follow the prompts.
- Your EFS will be saved in the same folder as the tool, in the .img format.
- If you want to restore EFS all you have to do is to click on the “Restore_EFS” executable, follow the prompts again and that’s it.
Nokia 1280 1616 1800New insert sim solution100 tested
Nokia 1280/1616/1800 New insert sim solution100% tested

Wednesday, August 27, 2014
HDMI Fix for Sumvision Cyclone Voyager 7 Android 4 2 2 firmware About Tablet Solution

This is a 7 inch,8 inch & 10.1 Dual core Android Tablet
i share this tablet official Firmware,How To update this tablet,how to root this tablet Step By Step procedure Here us
Download HDMI settings_fix.zip from here, here or here. Dont extract it; just copy it on a micro SD card and install the file from CWM. Install CWM 6.0.31 using this tutorial or take a look here.
Flash Backup v3 0 7 Full
enables to manage firmware
patch function
built-in flash tool
Requirements
A compatible Motorola phone
USB cable
P2K driver
Windows 2000/XP or higher
Supported phones*
Motorola C380
Motorola C381P
Motorola C390
Motorola C650
Motorola E1 ROKR
Motorola E1000
Motorola E1070
Motorola E375
Motorola E398
Motorola E770v
Motorola K1 KRZR
Motorola K3
Motorola L2
Motorola L6
Motorola L7 SLVR
Motorola L7e
Motorola U6 PEBL
Motorola V180
Motorola V186
Motorola V188
Motorola V220
Motorola V235
Motorola V3
Motorola V300
Motorola V360
Motorola V3i
Motorola V3r
Motorola V3re
Motorola V3t
Motorola V3x
Motorola V3xx
Motorola V400
Motorola V500
Motorola V547
Motorola V6 MAXX
Motorola V600
Motorola V620
Motorola V635
Motorola V980
Motorola V9 RAZR2
Motorola Z3 RIZR
Operating with other models is possible
Download here
How to Take a Screenshot on Nexus 5
You can easily take a screenshot on your phone that you can save in your Gallery or share with others:
1. Make sure the image you want to capture is displayed on the screen.
2. Press the Power and Volume down buttons simultaneously.
The screenshot is automatically saved in your Gallery.
TIP: To easily share your screenshot via Gmail, Google+, and more, swipe down the notification shade and touch the Share icon next to the preview of your screenshot.
Samsung Galaxy S4 gets a new Android 4 2 2 Jelly Bean firmware OTA Update Move Apps to SD Card Feature now supported
Samsung Galaxy S4 Snapdragon version has received a brand-new software update that improves the OS and it adds some stability tweaks. The update has been pushed out earlier today to Germany and numerous users have reported that the internal storage space has been increased and, from now on you will be able to move applications to SDcard.
There are several other enhancements added but, the stock OS will stay to Android 4.2.2 Jelly Bean while the firmware build is I9505XXUBMEA. This new OTA Update is available for Germany-based Galaxy S4 Snapdragon 600 phones and it build date is May 29th. Also, it seems like this update should be available soon for the GalaxyS S4 Exynos 5 device in the next few weeks.
Samsung decided to work on this release after users complained about the numerous bugs found in the original batch of Android 4.2.2, the first firmware that was delivered with the Galaxy S4. The 16GB model of this device will have its user accessible memory increased so that you will be able to install more applications. Also, from now on you will be able to ‘move apps to SDcard’, a feature that was available until now in all the previous Android operating systems.
Other changes added to the Android 4.2.2 XXUBMEA Jelly Bean OTA Update for Samsung Galaxy S4 I9505 are as following: a new and improved Camera firmware, Smart Pause Toggle added, Move Apps to SD Card, HDR Video is now supported, Semi-transparent notification bar, new Icons for the Settings menu, Secure Boot status and a new feature that improves the legibility on Super AMOLED displays.
There are some other small tweaks and improvements that should enhance the overall performance of the Samsung Galaxy S4 Snapdragon model. Since this update is only available in Germany, you shouldn’t bother to check for ‘System Updates’. Other countries will get the OTA Update to Android 4.2.2 XXUBMEA Jelly Bean soon.
If you’re in Germany and you didn’t receive the OTA Update notification, then you should go to ‘System Updates’ menu and check for availability. If the updating menu of your Samsung Galaxy S4 tells you that you’re already on the latest Jelly Bean firmware, then you can run the Samsung KIES software on your PC for the OTA Update files to be installed on your device.
However, even if this update hasn’t been pushed out for your Galaxy S4 region, then you can easily flash it using ODIN and this guide HERE. That’s a manual guide that you can use to get the latest Jelly Bean firmware update for your device without losing any data files in the process. The news and file availability have been released via SamMobile.
Did you upgrade your Galaxy S4 I9505 with Android 4.2.2 XXUBMEA Jelly Bean? If you did, is your device working better and the ‘move apps to SD card’ work correctly? Tell us in comments your impressions after testing the new OS for your devices.
Read More..
There are several other enhancements added but, the stock OS will stay to Android 4.2.2 Jelly Bean while the firmware build is I9505XXUBMEA. This new OTA Update is available for Germany-based Galaxy S4 Snapdragon 600 phones and it build date is May 29th. Also, it seems like this update should be available soon for the GalaxyS S4 Exynos 5 device in the next few weeks.
Samsung decided to work on this release after users complained about the numerous bugs found in the original batch of Android 4.2.2, the first firmware that was delivered with the Galaxy S4. The 16GB model of this device will have its user accessible memory increased so that you will be able to install more applications. Also, from now on you will be able to ‘move apps to SDcard’, a feature that was available until now in all the previous Android operating systems.
Other changes added to the Android 4.2.2 XXUBMEA Jelly Bean OTA Update for Samsung Galaxy S4 I9505 are as following: a new and improved Camera firmware, Smart Pause Toggle added, Move Apps to SD Card, HDR Video is now supported, Semi-transparent notification bar, new Icons for the Settings menu, Secure Boot status and a new feature that improves the legibility on Super AMOLED displays.
There are some other small tweaks and improvements that should enhance the overall performance of the Samsung Galaxy S4 Snapdragon model. Since this update is only available in Germany, you shouldn’t bother to check for ‘System Updates’. Other countries will get the OTA Update to Android 4.2.2 XXUBMEA Jelly Bean soon.
If you’re in Germany and you didn’t receive the OTA Update notification, then you should go to ‘System Updates’ menu and check for availability. If the updating menu of your Samsung Galaxy S4 tells you that you’re already on the latest Jelly Bean firmware, then you can run the Samsung KIES software on your PC for the OTA Update files to be installed on your device.
However, even if this update hasn’t been pushed out for your Galaxy S4 region, then you can easily flash it using ODIN and this guide HERE. That’s a manual guide that you can use to get the latest Jelly Bean firmware update for your device without losing any data files in the process. The news and file availability have been released via SamMobile.
Did you upgrade your Galaxy S4 I9505 with Android 4.2.2 XXUBMEA Jelly Bean? If you did, is your device working better and the ‘move apps to SD card’ work correctly? Tell us in comments your impressions after testing the new OS for your devices.
iPhone 5 Handsfree Problem Solution

iPhone5 Handsfree Problem Solution,iPhone5 Handsfree Problem Ways Solution,iPhone5 Handsfree Problem No Ear Sound Solution,iPhone5 Handsfree repair Solution,iPhone5 Handsfree Mode Problem Solution,iPhone5 Handsfree Not Detected Problem Solution
Tuesday, August 26, 2014
Nokia 7510 rm 398 Latest Version 6 65 Flash File Free Download
Nokia Mobile 7510 rm 398 Latest Flash Files Mcu Ppm Cnt Free Download

DOWNLOAD LINKS
Nokia Mobile 7510 rm 398 Latest Flash Files Mcu Ppm Cnt Free Download
Nokia C7 Touch Screen Problem jumper ways Solution tested
Try this steps hope this helps, but Im not saying that this will work 100%. Im just intrigue, yours have a unusual situation here.


Monday, August 25, 2014
Samsung I9100 GalaxyS2 Dead Short fix problem


Gfive W5 network solution

How to do this work : At first restore factory setting using security code 1234 and open your phone see result.If result same then check ant of your phone.next check ant line and next rehot pa.But problem still then change pa.
Asha 203 Asha 202 Memory Card how to fix problem
This solution is for Nokia Asha 203 and Nokia Asha 202 Memory Card problem. It applies to both of these phones because they are schematically the same phones.
MMC problem in Nokia Asha 202 and Nokia Asha 203 can occur because of faulty memory card jacket. It can also occur because of moisture or carbon. So first of all clean the memory card base and the general area around it if that does not work I have marked Nokia Asha 202 Memory Card IC in the diagram below. Replace the Marked MMC IC and the problem will be solved.
Please Note that we will edit these solutions or add new ones if found in this page at any time in the future. So feel free to come back any time on this page to stay up to date.

If you have further Questions please dont hesitate to leave a comment.
Note: Every repairing solution posted here is tested by at least one member of our team. Use the information available here at Your Own Risk. We are not responsible if any harm comes to your device during the repairing process.
Sunday, August 24, 2014
How To Install Android 4 4 Kitkat In T Mobile Samsung Galaxy S4
Warnings:
Below are some warning statements that you must be knowing before preparing to Root orInstall Custom Rom in your T-Mobile Samsung Galaxy S4 Android Smartphone:


- Rooting/Installing Custom ROM is not an authorized process hence you’ll be losing all your warranty benefits over your T-Mobile Samsung Galaxy S4 after Rooting/Installing it.
- There are certain risks of damaging your Android Smartphone while Rooting/Installing Custom ROM in it. Hence, it is recommended that you proceed at your own risk and we are not to be held responsible even if your Smartphone gets damaged during or after completing the Rooting/Custom ROM installation process.
- You might not receive any future official software or firmware updates after rooting and installing Custom ROM in your T-Mobile Samsung Galaxy S4.
Before You Begin:
- You need a Windows based PC or Laptop.
- This custom ROM is tested & working in T-Mobile Galaxy S4 only.
- Root & Install Custom Recovery in your T-Mobile Samsung Galaxy S4.(Links are given in Some Important Articles section above)
- Download Samsung USB Drivers and connect your device with PC for complete the installation.
SAMSUNG:
- Download Samsung USB Drivers or Download Samsung Kies (Contains Drivers).
- Enable USB Debugging in your T-Mobile Samsung Galaxy S4.
- Your device must be charged 50% minimum.
- Make backup of device data for safety.
Download Required Files:
How To Update T-Mobile Samsung Galaxy S4: - Follow all the instruction given above for safe installation.
- Now connect you device to PC with USB cable.
- Move or Copy both downloaded files on your external sdcard.
- Now switch off your device and boot into recovery mode.To do this, Press and Hold Volume Up + Home and Power buttons.
- Once you’re in Recovery Mode, Select wipe data/factory reset, followed by wipe cache and wipe dalvik cache from advanced.
- Now go back to the main menu of Recovery Mode and select “install zip from SD card”.
- Select and Install custom rom zip file and then GApps package.
- After successful installation, go back to main menu of Recovery Mode and select reboot system now.
- First boot can take upto 5 minutes.


How To Update Galaxy Note 3 SM N900 via Kies
- Make sure you have stable internet connection on your computer.
- Now download and install Samsung Kies on your computer.
- Turn on your device (if it off) and then connect it to computer with USB cable.
- Run Samsung Kies and wait for it to detect your device.
- You should see a New Firmware Upgrade is available at Samsung Kies home screen.
- Press the Firmware Upgrade button to proceed.
- Follow on screen instruction and soon you will see your device running upgrade and reboot automatically. Once done, you can disconnect your device from computer.
N900XXUDNA6 Android 4.3 Jelly Bean Firmware Details:
PDA: N900XXUDNA6
CSC: N900SERDNA6
Download: N900XXUDNA6_N900SERDNA6_SER.zip
[Please Note: After flashing this firmware you will lost any installed custom ROM including CM10.2, AOKP, Avatar, Beanstalk, Omni ROM, Slim ROM, Pac-Man, Paranoid Android, LiquidSmooth or Carbon.
Saturday, August 23, 2014
all nokia 2010 complete solution

Supported Models:
light solution,bb5 local mode,charge solution,not support
keypad solution,insert sim solution,camera solution,mic solution*
bb5unlock,cable,lcd finder,other
Download
http://hotfile.com/dl/54773240/82e089f/ALL_NOKIA_2010_COMPLETE_SOLUTION_fixedgsm.com.rar.html
Nokia C1 01 bluetooth fm radio Problem with Jumper Solution
Nokia C1-01 bluetooth fm radio solution.
![Nokia]()
Read More..

Samsung E251 Keypad not working fix problem


Friday, August 22, 2014
Sony Ericson K550i Keypad wey


K550i-K550im And K550c Sony Ericson Keypad wey Solution...
if you check it much give few comments about this so that others can learn form your comments also.
If you have any other Questions please do not hesitate to share with me.
2730 Insert Sim Ways how to fix problem

following article. Also you will find Nokia 2730 Insert Sim Ways and
Jumpers information in the diagrams further in this post.
In Nokia 2730 Insert Sim Card Problem can occur because of the faulty
Sim Card Connector, Sim IC or it's bad connection to the Cell Phone's
Motherboard. Bad connections can happen for many reasons like if it's
dropped or got wet, bad connection may also happen because of Carbon,
Rust or even Dirt. So first of all you should clean Nokia 2730 Sim
Card Ways, Sim IC, Sim Card Connector and Motherboard of the Mobile
Phone.
You Can Use any cleaning liquid for this purpose like CTC or any other
you prefer. If you are certain that the bad connection is not the
reason for your Mobile Phone's fault, then you can replace the Sim
Card Connector, Sim IC with a new one.
Please Note that we will edit these solutions or add new ones if found
in this page at any time in the future. So feel free to come back any
time on this page to stay up to date.
If you have further Questions please don't hesitate to leave a comment.
Note: Every repairing solution posted here is tested by at least one
member of our team. Use the information available here at Your Own
Risk. We are not responsible if any harm comes to your device during
the repairing process.
sprint d300 power button ways
One day a familiar man came to me.Hi said his phones power button dose not work.He gave her phone and said repair it.I received the phone and check the phone.I saw power button is not work really then I open the phone and I Search the problem.Then check full mother board and get the fault.View the below picture then you can understand how to do repair this.I hope if you see this picture you will be solved your problem.

How to do this work : Check power button on your phones keypad if you see there are no line then you can check this line.If damage any line then make jumper following this repair picture.
Reset Samsung Focus S SGH I937 to Restore Factory Settings
Reset Samsung Focus S SGH I937 to Restore Factory Settings - Samsung Focus S SGH I937 features a large 4.3” Super AMOLED and electrical phenomenon touchscreen (480 x 800 pixels resolution) with Multitouch, Touch-sensitive controls, measuring system and Proximity detector. The phone uses Microsoft Windows Phone 7.5 Mango software in conjunction with 1.4 rate Scorpion C.P.U. and 512 MB RAM. It offers 16GB/32GB internal storage (optional) while not memory card slot. The property options consist of: Wi-Fi 802.11 a/b/g/n; Bluetooth v3.0 with A2DP, EDR; and microUSB v2.0.

Reset Samsung Focus S SGH I937 to Restore Factory Settings
You can reset your Samsung Focus S SGH I937 to restore the original factory setting by following below instructions:
From the Home screen, touch  ➔ Settings
  ➔ system ➔ about ➔ reset your phone.
OR
- Press and hold the Power key to power off the phone, if necessary.

- Power up the device by pressing the Camera key,Volume down key ,andPower key.
When the device vibrates, release the Power key, but continue pressing the Camera andVolume down keys. Once the device displays the Are you sure you want to format? screen, release the Camera andVolume down keys. (see picture for detail illustration)
Nokia New LCD Finder

All Nokia Mobile Phone New LCD (Display) Finder Download
if you check it much give few comments about this so that others can learn form your comments also.
If you have any other Questions please do not hesitate to share with me.
Thursday, August 21, 2014
SE Broadcom Codes Reader v1 01
Unlock SonyEricsson
Supported all SE Broadcom (J210i, J220i, J230i, K210i, K220i K230i, ...).J2X0i, K2X0i.
Download here
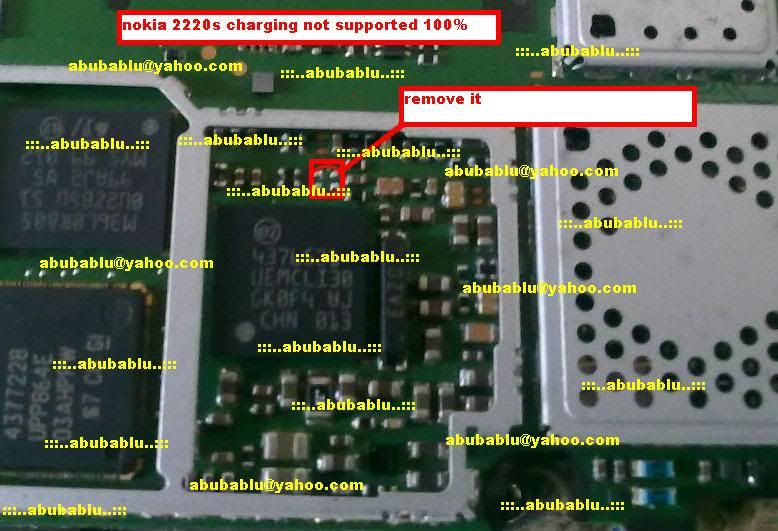
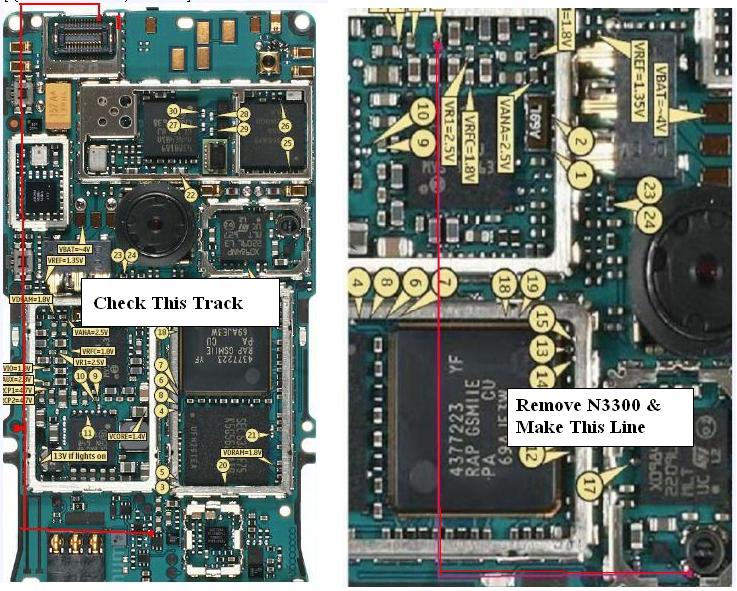
Nokia 1200 charging jumper
Nokia 1200 is very nice phone, it use very easy.So many people use this phone.It is popular phone in the world.However,now i share how to repair nokia 1200 charging problem.you can repair charging problem use this solution.


How to do this work : Nokia 1202 charging solution is very easy If any body face this problem,then first check charging port next check fuse coil and diode and last check red mark jumper.
Subscribe to:
Comments (Atom)